| 일 | 월 | 화 | 수 | 목 | 금 | 토 |
|---|---|---|---|---|---|---|
| 1 | 2 | 3 | 4 | 5 | ||
| 6 | 7 | 8 | 9 | 10 | 11 | 12 |
| 13 | 14 | 15 | 16 | 17 | 18 | 19 |
| 20 | 21 | 22 | 23 | 24 | 25 | 26 |
| 27 | 28 | 29 | 30 |
Tags
- 재귀
- java #자바 #동빈나
- 백트랙킹
- 투포인터
- dp
- 자바 #java
- java #자바 #생활코딩
- 알고리즘
- BFS
- 백준 #파이썬 #알고리즘 #코딩테스트
- 파이썬 #백준 #알고리즘 #코딩테스트
- PYTHON
- css #생활코딩 #웹
- css #웹 #생활코딩
- 프로그래머스 #파이썬 #코딩테스트 #알고리즘
- 프로그래머스 #파이썬 #알고리즘 #코딩테스트
- DFS
- 코딩테스트
- Dijkstra
- 백준
- react #리액트 #동빈나 #나동빈 #유튜브강의
- java #자바
- 파이썬 #알고리즘 #코딩테스트 #프로그래머스
- 백준 #알고리즘 #파이썬 #코딩테스트
- 다이나믹프로그래밍
- 다익스트라
- react #리액트 #동빈나
- 프로그래머스
- java #자바 #나동빈
- 파이썬
Archives
- Today
- Total
커리까지
농구영상 득점 자동 판별기 만들기 본문
728x90
SMALL
import cvlib as cv
from cvlib.object_detection import draw_bbox

image_path = 'ball.PNG'
im = cv2.imread(image_path)

bbox, label, conf = cv.detect_common_objects(im)

print(bbox, label, conf)

im = draw_bbox(im, bbox, label, conf)

cv2.imwrite('result.jpg', im) 
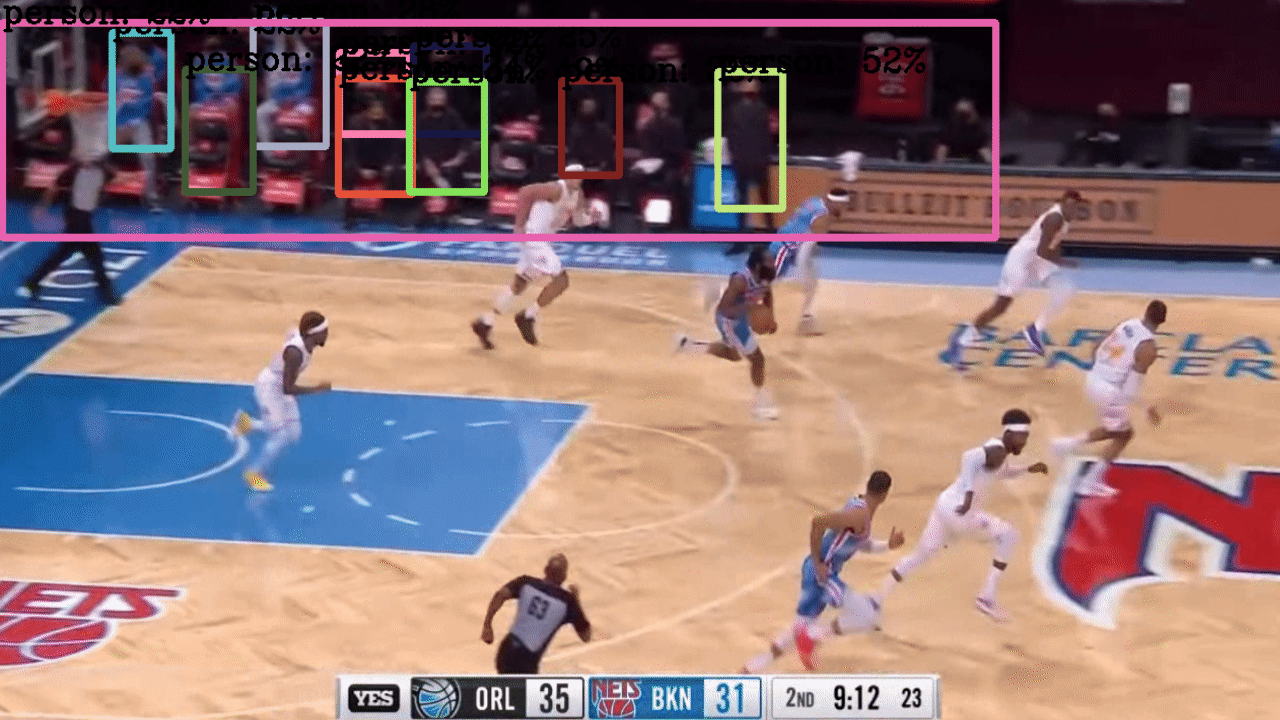
- 이 사진처럼 사람을 식별하고 공을 식별해서 자동으로 득점을 기록하고 어떤 선수가 넣었는지 기록하는 것을 만들어보려고 한다.
- 이것은 사진이라 이렇게 판별이 가능한 것이고 영상으로는 다음의 링크를 참고해서 하려고 한다.
데모 실행해보기
- tutorial 실행하는데 경로 설정하는게 가장 힘들었다. 참고 해서 정상적으로 만들때는 바꿔야겠다.
- 코드 분석이 더 필요하다. 그냥 하는것보다 분석해서 하는게 나중에 큰 도움이 될 것 같다.

))

- 실행하면 요로코롬 나온다.

- 마지막 부분에서 이러한 오류가 발생하여 잡기로 해결방법을 찾으려고 한다.
오류 잡기
- 텐서플로의 2.x버전의 문제로 1.x 버전을 사용하면 된다고 나와있다.
!pip uninstall tensorflow
!pip install tensorflow==1.15- 기존의 텐서플로우를 삭제하고 다시 1.x버전으로 설치한다.
- 예전에는 2.x버전에서도 자동으로 변환?같이 해줘서 실행되었다는데 요즘은 안 되는것 같다.
- uninstall이 안 될경우 그냥 install을 해도 설치가 되었다.
model_name = 'ssd_mobilenet_v1_coco_2017_11_17'
detection_model = load_model(model_name)- 이 부분에서 오류가 나서 다시 2.x버전으로 위의 오류를 해결할 방법을 찾아보자.
- 코랩으로 돌려야하는것 같아서 코랩으로 돌려보려고 한다. 지금까지는 주피터에서 작업하였다.
tensorflow-gpu깔기
- cpu버전과 gpu버전이 있어서 gpu버전도 설치하였다. 거의 4~5시간정도 걸렸다.
- 밤새 켜놓았는데도 다 안껼려서 그냥 꺼버렸다.
다른 코드 구동하기
import numpy as np
import os
import six.moves.urllib as urllib
import sys
import tarfile
import tensorflow as tf
import cv2

import tensorflow.compat.v1 as tf

tf.disable_v2_behavior()


# This is needed since the notebook is stored in the object_detection folder.
sys.path.append("..")

from utils import label_map_util
from utils import visualization_utils as vis_util

tf.reset_default_graph()
tf.get_default_graph()

# What model to download.
MODEL_NAME = 'ssd_mobilenet_v1_coco_11_06_2017'
MODEL_FILE = MODEL_NAME + '.tar.gz'
DOWNLOAD_BASE = 'http://download.tensorflow.org/models/object_detection/'

# Path to frozen detection graph. This is the actual model that is used for the object detection.
PATH_TO_CKPT = MODEL_NAME + '/frozen_inference_graph.pb'

# List of the strings that is used to add correct label for each box.
PATH_TO_LABELS = os.path.join('data', 'mscoco_label_map.pbtxt')

NUM_CLASSES = 90

opener = urllib.request.URLopener()
opener.retrieve(DOWNLOAD_BASE + MODEL_FILE, MODEL_FILE)
tar_file = tarfile.open(MODEL_FILE)

for file in tar_file.getmembers():
    file_name = os.path.basename(file.name)
    if 'frozen_inference_graph.pb' in file_name:
        tar_file.extract(file, os.getcwd())

detection_graph = tf.Graph()
with detection_graph.as_default():
    od_graph_def = tf.GraphDef()
    with tf.gfile.GFile(PATH_TO_CKPT, 'rb') as fid:
        serialized_graph = fid.read()
        od_graph_def.ParseFromString(serialized_graph)
        tf.import_graph_def(od_graph_def, name='')

label_map = label_map_util.load_labelmap(PATH_TO_LABELS)
categories = label_map_util.convert_label_map_to_categories(label_map, max_num_classes=NUM_CLASSES, use_display_name=True)
category_index = label_map_util.create_category_index(categories)

def load_image_into_numpy_array(image):
  (im_width, im_height) = image.size
  return np.array(image.getdata()).reshape((im_height, im_width, 3)).astype(np.uint8)

# Size, in inches, of the output images.
IMAGE_SIZE = (12, 8)

with detection_graph.as_default():
    with tf.Session(graph=detection_graph) as sess:
#         cam = cv2.VideoCapture(0)
        cam = cv2.VideoCapture('./img2/nba_sample2.mp4')

        while True:
            ret_val, image = cam.read()

            if ret_val:
                # Expand dimensions since the model expects images to have shape: [1, None, None, 3]
                image_np_expanded = np.expand_dims(image, axis=0)
                image_tensor = detection_graph.get_tensor_by_name('image_tensor:0')

                # Each box represents a part of the image where a particular object was detected.
                boxes = detection_graph.get_tensor_by_name('detection_boxes:0')

                # Each score represent how level of confidence for each of the objects.
                # Score is shown on the result image, together with the class label.
                scores = detection_graph.get_tensor_by_name('detection_scores:0')
                classes = detection_graph.get_tensor_by_name('detection_classes:0')
                num_detections = detection_graph.get_tensor_by_name('num_detections:0')

                # Actual detection.
                (boxes, scores, classes, num_detections) = sess.run(
                        [boxes, scores, classes, num_detections],
                        feed_dict={image_tensor: image_np_expanded})

                # Visualization of the results of a detection.
                vis_util.visualize_boxes_and_labels_on_image_array(
                        image,
                        np.squeeze(boxes),
                        np.squeeze(classes).astype(np.int32),
                        np.squeeze(scores),
                        category_index,
                        use_normalized_coordinates=True,
                        line_thickness=8)


                cv2.imshow('my webcam', image)

                if cv2.waitKey(1) == 27:
                    break  # esc to quit

        cv2.destroyAllWindows()
- import tensorflow.compat.v1 as tf
- 이 코드를 넣어서 구동하게 만들었다.
- 실제로 웹캠이 켜지고 사람이라고 인식하고 휴대폰도 cell phone이라고 인식한다.
- 웹캠으로 지정된 부분을 수정하여 영상으로 바꿔서 시도하려고 한다.
- 이거하려고 거의 하루 넘게 걸린것 같다 ㅠㅠㅠ
- 더 많이 공부해야겠다.
동영상 인식 성공

- 원하는 그림이었지만 전부 사람으로 인식 못하고 몇명만 인식하는 수준이다. 또한 공을 인식못해서 더 찾아봐야겠다. 다른 파일들오 실행하려고 하는데 자꾸 오류가 나고 해서 가상환경을 만들어서 하던가 다른 코드를 찾던가 더 깊게 파든가 암튼 뭘 해야겠다.
yolo로 돌려보기
이 블로그를 참고해서 작성하였다.
- 주피터대신 파이참으로 실행하였다.
- 위에 있는 코드보다 길이도 짧고 사람도 더 많이 인식한다. 그러나 벤치쪽에 있는 사람들만 인식하고 밑에 코드에서 뛰는 사람들은 전혀 인식을 못한다.
- 또한 너무 느리다. 노트북 사양때문에 그런가....
- 이건 cpu로 사용해서 그렇다는것 같다. 아마 gpu를 따로 설정해야하나보다.
- 노트북 gpu사양이 너무 낮아서 gpu를 돌릴 수 없어보인다.... 그래서 노트북 gpu를 업그레이드 하는 방법을 찾고있다.
- 그 이유를 찾아서 바꾸어보려고한다.
- 런닝맨 영상으로 실험해보았다.

- 카메라를 소화전으로 인식한다. 그래도 사람이나 다른 물체들은 잘 인식했다.
gpu로 돌리는 방법을 더 찾을 계획
- cpu로는 도저히 못돌릴것 같다. 너무 느리다. gpu돌리는 방법을 찾는데 mx250에 맞는 방법을 아직 못찾았다. 계속 설치하고 path연결해도 gpu를 사용한다는 말이 안 뜬다. 더 찾아봐야겠다. 코랩으로 했는데 코랩은 또 cv2를 지원안해서 cv2_imshow로 바꿔서 하는데 이건 뭐 이미지로 하나하나 뿌려줘서 오히려 fps가 0.6이 나온다.ㅠㅠㅠㅠㅠㅠ
728x90
LIST
'프로젝트 > 농구 득점 영상 딥러닝 만들기' 카테고리의 다른 글
| basketballVideoAnalysis 오픈소스 해보기 (0) | 2021.06.21 |
|---|---|
| Court Reconstruction for Camera Calibration in Broadcast Basketball Videos (0) | 2021.04.12 |
| 아마존 AWS E2C 스팟인스턴스 사용하기 (0) | 2021.02.26 |
| 농구영상 득점 자동 판별기 만들기 02 (0) | 2021.02.14 |
| Geforce mx250 tensorflow gpu 설치 + 설정 (0) | 2021.02.08 |
'프로젝트/농구 득점 영상 딥러닝 만들기' Related Articles
more

Comments